* Note – I’ve setup a new blog for articles and contributions like this, click here*
Version 1 /5/7/12 – Created. Eventually going to update this with some images.
This is an introduction to the science and principles behind using infrared light to track the position and pose of performers live. Data about performer movements can then be used to feed lighting, sound and audiovisual systems.
This article covers how to collect movement data via threshold tracking in a theatre environment. It does not focus on how to use the data. The approach discussed here is also not the only way to collect this data.
About the author: My background is originally in lighting design, before expanding into vision design and custom programming for live works. I’ve tracked performers within contemporary shows where the tracking is something the audience is concious of as a feature of the performance. I’ve also deployed it in traditional theatre shows where it has been used for only a moment here and there as part of the palette of visual effects of the show. In the latter case the audience hasn’t been specifically aware that tracking technology is used.
Discussion of methods for performance tracking:
To track a performer onstage we basically want to obtain a camera image where the body of the performer(s) can be identified apart from the background. Ideally we want to be able to do anything in the visible world and still track, which is why many of these systems use infrared at all. There are several approaches:
Pose Recognition/Machine Learning/Kinect
Computer recognition of video images has come a long way in recent years. Computers can now identify the faces of humans and cats with increasing reliability from a plain 2D image. This technology often uses algorithms that are trained over time with many such images rather than being logically built. Technology such as the Microsoft Kinect allows recognition of a full human body by emitting an infrared tracking grid and augmenting the video image with a depth image.
The Kinect solution is definitely the future of this kind of work, and is only limited at the moment by the small ‘play area’ allowed by the current model. If a stage sized Kinect was developed along with robust algorithms for pose recognition of a whole group of dancers and networking of multiple kinects from different angles we would have the ultimate interaction system. This is entirely possible with todays technology but it would require significant hardware development beyond the consumer Kinect for a product that would, ultimately, reach a much smaller market. We can only hope that someone is funding such development.
The biggest advantage of Kinect is getting skeleton data – you know exactly where limbs are in relation to other limbs. It’s easy to extract information from this like angle of arms, whether hands are above head etc….
A limitation of the current Kinect (beyond small interaction area) is that the algorithm cannot detect shapes which aren’t human or are a significant departure from the average human. For instance wearing a mask that changes the profile of your head to be rectangular can easily cause you to become ‘invisible’ to the kinect.
Real Markers:
For years motion capture for film was achieved through the use of special suits that were equipped with infrared reflective balls. These would be recorded on many angles by infrared cameras. If the system knew the balls were on particular parts of the body, eg top of the head, apex of neck etc… it could then map these onto virtual skeletons. These skeletons can in turn animate virtual characters in the film.
These systems are robust and can be deployed in a range of environments, they can record very precise detail. When combined with face tracking algorithms they are the ultimate tool for getting an actors complete performance into the virtual realm.
The main limitations are that these systems are expensive (priced for commercial film production) and require the performers to wear a very distinct costume.
It is also possible to track fiducial markers – patterns that a machine can recognise. However even if these were printed in infrared ink to make out the patterns at any significant distance you would need an incredibly high resolution camera and super consistent lighting.
Difference tracking:
This involves flooding an area with infrared light and taking a snapshot with the area empty. Every new frame of video is compared to the snapshot. When the performer enters the area the changed pixels are detected.
The data obtained from difference tracking is simply the location of the changed pixels. This makes it very fast and responsive. However unlike Kinect the changed pixels simply represent the volume of space taken up by the performer. Pose cannot be easily understood by the computer from this data. However rate of change, position onstage and distance from other tracked objects is easily calculated.
The main limitation of difference tracking is coping with changes of the current image from the reference image that are not part of the performance. I.E changes in ambient light level, entrance of fixed set objects or new marks on the set/floor. A new snapshot can be taken but only if all the performers leave the stage.
Potentially live correction of a difference tracking reference image is possible but can be very tricky. For example if you had a changing set you could have a snapshot of each configuration already saved that can be compared to the live version. However if even the shadow of a set element falls slightly in the wrong place it could cause false hits in the tracking algorithm. Although if all the actors leave stage between scene changes you could take a new snapshot live….. In any case you will need to have a plan of attack to manage changes from your snapshot if you use difference tracking.
Threshold tracking:
This involves creating a high contrast image in the infrared world. Either the performer or the background is highly reflective to infrared whilst the other is not. A threshold is then selected and all pixels over or under this threshold are considered to belong to the performer.
Or in other words: You light the performers so that, in the infrared camera, they appear white and everything else appears black. You then tell the computer to track all the white pixels.
One of the earliest and most sophisticated implementations of threshold tracking was by Art+Com in Germany on Marlowe, The Jew of Malta in 2002. See here and for a video here. tThe video is probably one of the best explanations of performance tracking available. Art+Com also achieved the holy grail of live performer tracking which is being able to differentiate individual performers even when they obstruct each other.
Like difference tracking the data that you get is only the affected pixels, not pose or skeleton information. Rate of change, position onstage and distance from other tracked objects is easily calculated.
Threshold tracking is my preference because of it’s flexibility. If you are capable of controlling the light you can track on nearly any physical stage layout. There are no limitations on costume, even materials that appear dark to an infrared camera can be tracked if you can control the lighting of adjacent objects properly.
The main reason I prefer threshold tracking over difference tracking is that threshold is more deployable in performances that aren’t built around having tracking technology as a central feature of the work. I.E It’s easier to use it as an effect in a single scene of a normal play. Where for maximum effectiveness difference tracking must be setup from the start of a performance threshold tracking can be used for a scene here and there and the lights/space can do something else before, after and in-between.
Method for threshold tracking for live performance:
Some science background:
What is light?
Light waves are part of the electromagnetic spectrum, along with radio waves, gamma waves, microwaves etc. Each kind of wave is identified by it’s frequency. At the low end of the spectrum are low frequency waves: radio waves. At the high end are the super high frequency waves: X-ray and Gamma radiation.
In the “middle” of the spectrum is the area we see as visible light. If you break this area down into it’s frequencies you get individual colours. Within this portion red is low frequency and blue/violet is high frequency.
What is infrared?
Infrared is literally the frequencies of light below visible red. It generally behaves like normal light, I.E reflects, refracts and bounces around the room the same way, except that we can’t see it.
At the low end of the infrared section and you have thermal infrared – the frequencies of light we feel as radiated heat.
In life a green shirt is a piece of fabric that reflects visible green and absorbs all other colours. Hence we see green. When looking at an image from an infrared camera some items appear to be very reflective to infrared whilst others don’t. It’s the same principle. There are no hard and fast rules, some white fabrics are also white in infrared, some are dark in infrared. The only way to know is to test. I haven’t yet come across a black timber paint that is reflective in infrared but have seen much black fabric that is reflective in infrared.
Infrared and Thermal Infrared Cameras
When we talk about infrared cameras it’s important to understand that we are not talking about thermal infrared cameras.
-
A plain infrared camera is inexpensive. In fact most chips inside most cameras are capable of seeing some infrared, they simply have a filter installed that prevents this occurring. There is a wide range of relatively cheap security cameras available that see in infrared.
-
A thermal infrared camera is a fairly expensive piece of equipment. They are often used for industrial testing and by the military as night vision equipment. They can literally see the heat emitted by people and items.
In both cases the image we see on the monitor is a visible light version of the infrared picture. This is referred to as a ‘false colour’ image. We aren’t seeing actual infrared light because, of course, we can’t see it. The colours on a thermal camera display are tuned to mean very specific temperatures. The colours on a plain infrared camera display are not necessarily tuned to mean anything and often just appear in black and white.
Filters
In this field we often use filters. Filters are materials that we place in front of a camera or light to block certain frequencies of light or infrared. By implication if we are blocking one set of frequencies we are passing others. Examples of filters:
-
Lighting Gel: Polycarbonate sheet that Is placed in front of a theatre light to change it’s colour. It only passes the desired colour and blocks all others. Incidentally most lighting gels also pass infrared. As we can’t see it it doesn’t affect the colour and means the gel will last longer as it’s not absorbing as much energy.
-
Infrared block filter/Visible light pass filter: Installed on most webcams and cheap cameras. This helps prevent them becoming overexposed from an excess of infrared light.
-
Visible light block/infrared pass filter: Installed on a security camera that claims to work on infrared only. Possible to get these as an attachment for some SLR cameras to do infrared photography.
Lenses:
A lens changes the path of light. It allows a camera or a lighting fixture to change it’s field of view/field of illumination. By default there is nothing to say a lens will also be a filter. Be wary though as some camera lenses also have infrared blocking coatings.
Equipment:
Lights:
Infrared light is produced (along with visible light and heat) by most conventional theatre lamps that use a tungsten filament light source. Accessories like shutters and barndoors can be used to shape the infrared light as normal. Generally if a lamp has a warm tone to its light and has a filament it produces significant quantities of infrared. This excludes some newer models of conventional that filter this out in their reflector system. Notably Selecon Pacifics and the Selecon Acclaim Axials.
Most discharge based fixtures do not produce significant quantities of infrared. This includes fluorescent tubes (even those labeled as ‘warm white’), most intelligent lights and digital projectors.
In short: Most old school theatre lights also work as infrared lights. Conversely digital projectors and moving lights emit little to no infrared.
There are infrared floodlights on the market but they produce, as the name implies, a flood of light that is not easily controlled. For a security viewing application this is fine but we typically need more control to make them suitable for threshold tracking. If they flood the performer and stage evenly we can’t tell the difference between them in the camera.
Lighting gels are designed to block some frequencies of visible light to produce colour. They always pass through heat and infrared so they last longer before burning out. Using dark purple gel eg Lee 181 you can get lights that pass lots of infrared but not much visible light, hence turn theatre lights into highly controlled infrared lights. As a bonus you can focus the lights as normal and then only pop the gel in as required.
How you position the lights will depend on your application but basically you want to light the performer really well and everything else as little as possible. The angle of your camera is also important. For instance if your camera is from above you will see a lot of floor. You want the person standing on the floor to be well lit but the floor to stay dark. One solution would be to use lights from the side that you can shutter or barndoor off the floor. You ideally want to have a consistent wash across your stage area.
Camera:
The most important points for selecting a camera are:
– Can see in infrared
– Low latency (time between real life and image appearing at computer)
– Correct lens/view for your application
HD is not necessary. 640 x 480 (or SD) is usually fine.
Re: Infrared capability: Many digital cameras have a sensor capable of seeing into the infrared range. However most consumer cameras usually come with a filter that blocks this so they only see in visible light. If you are into hardware hacking it is possible to remove this filter yourself. Alternatively many security cameras exist that are specifically advertised as infrared capable.
Re: Latency: You need to get the camera input into a computer. If you use an analog camera you will need a capture card. Most cheap capture cards are woefully slow, but if you can afford a nice once you are open to a world of cheap and effective security cameras with many lens options that can be placed nearly anywhere. If you use a USB or firewire cam you don’t have to use a capture card but you can only put them so far away from your computer. Make sure whatever you get (webcam or capture interface) is compatible with the operating system you intend to use.
Re: Correct lens: This is down to your application. If you plan to project digital light that maps tightly to performers the best way is to get a lens that allows a camera to have the same ‘view’ as your projector. Look up your projector manual for details. If you use a projector with 16:9 native aspect ratio keep in mind most security cameras and web cams are 4:3, so you will need to choose a lens that lets you see the 16:9 at it’s widest.
My recommendation for low latency and solid performance on PC is the USB PS3 eye cam with IR filter removed from here. You can also pickup a lens that suits the distances you will be working at. If you need to get the camera further away from the computer I’ve used two of these 10m active extender USB cables without a problem. (Longer than 20m is problematic) PC Drivers for a single PS3 eye camera can be found here under ‘CL Eye Platform Driver’
Once you have a camera that can see in infrared, you need a filter to block out the visible light so that it only sees in infrared. You want this filter to go in front of the camera. Commercial IR filters are available but I’ve found the simplest solution is to make one out of 4 – 6 layers of dark lighting gel eg, Lee 181. The advantage of putting a filter in front of the lens is that you can focus the camera without it and then add it later, allowing you to line up the camera shot to visible light markers such as projector field edges.
Software:
What software you use depends entirely on your application. You can use many different software packages, on Mac and PC. Personally I use vvvv for PC but any video toolkit with a blob tracking or contour tracking module should work. I suppose it goes without saying that you’ve got to be willing to roll up your sleeves and get technical to get the best results (or any results) out of your software. Because everyone’s needs are so wildly difficult it’s going to be nearly impossible to find a turn-key solution.
But don’t be daunted! It’s not that hard and there are people around willing to show you the ropes.
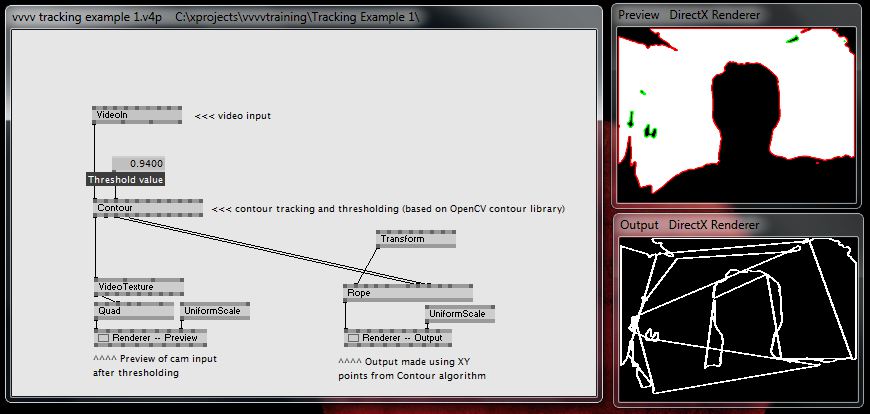
A basic tracking setup in vvvv using my laptops webcam. The XY coordinates of my head (and the room around it) are being visualised as a continuous line.
How to set up a threshold tracking system:
Again, this is application dependant, so I can’t cover every scenario. In this example we are setting up a system that will project light on a dancer using a digital projector. You may want to use tracking to trigger sound or do any number of things, so only some of this may be applicable.
Step 1: Work out the placement of your projector, camera and lights and what lenses you will need. This is almost always driven by either the projector you have or where you can put it, so that’s a good place to start.
For the example we only have access to a certain projector. In the manual it tells us that at it’s most zoomed out lens setting it needs to be 3m away to hit a 2m wide screen. Our stage is 10m wide. From this we do some basic maths and work out that for a 10m wide stage the projector needs to be 15m away. Luckily there is the perfect spot, on a lighting bar. The camera is aligned next to it, with the same ‘view’. Assuming we are also using the PS3 eye camera I would use the Peau Productions lens calculator here to find out that I need a 4.1mm lens.
Now that I know what my view of the stage is from the camera I can see how I need to light it. Because it’s a lighting bar from the front I can see a fair amount of floor and back wall. I’m going to use a number of profiles on h-stands (floor stands) as my tracking lights. They will be shuttered off the back wall and the floor so that the performers light up while the floor and wall don’t. I angle them upstage slightly so more light lands more on the front of the performer. I choose enough lights with the right beam angle and position them to get consistent coverage across the space. The last thing to be aware of is glare from the lights, even a dark stage will show glare on the floor if light is bouncing directly into the camera lens.. This is avoided by calculating the angles between your lights and the camera to ensure this is minimised. Having a matte floor surface helps as well. Shiny floors can create mirror effects in the infrared. I also want the lights to be offstage or at least not in the view of the camera so there is no chance of spill refracting off the lens of the fixture flaring out the camera
Step 2: Setup and focus your equipment.
Again start with the projector, ideally it covers the performance area and nothing more for the greatest efficiency. Remember if you want it to light performers it has to cover them in all the areas they will move, and may need to include hands above their head etc…
Next focus the camera. For this example we want it to be aligned to the projector so send the projector a test pattern and focus the camera so it can see the entire test pattern and nothing more. You will need a monitor close by the camera to do this. Drop the infrared filter (bundle of gel) in front of the camera when done.
Lastly focus your lights, drop the dark gel in front of each as you go. Shutter them off the wall and floor as planned.
It pays to check your light coverage in the camera monitor, if it looks consistent it usually is. Watch out for any spots on stage where you get weird reflections, glare or spill from the lights.
Step 3: Setup your software and start programming!
Hmm, this article is a lot longer than I thought it would be. Hopefully it’s not too dense. If you need some more pointers drop me a line at tobyk@tobyk.com.au and I’ll see what I can do. In my opinion the more people using this technology the better so I’m more than happy to support you.